はじめに
Istioとはどんなものなのか実際に使ってみて、ざっくり理解したいと思います。
Istioとは
Istionとは、サービスメッシュを実装するためのオープンソースです。

Istioには以下のような機能があります。
- ネットワークトラフィック管理
- セキュリティ
- 監視
サービスメッシュ
サービスメッシュとは、マイクロサービス同士が連携する通信を仲介し、制御するレイヤになります。
マイクロサービスでは、サービス間の通信が頻繁に行われます。その通信により発生する課題を解決するのがサービスメッシュとなります。
アーキテクチャ
Istioのアーキテクチャは下記のようになります。 EnvoyがProxyとしてサービス間の通信を仲介します。
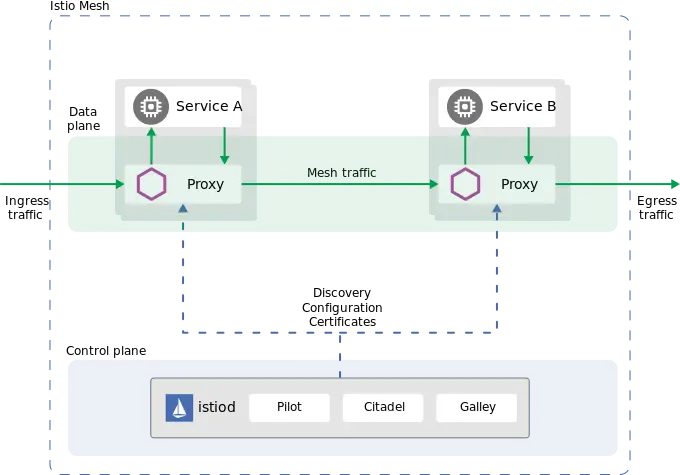 Istioのドキュメントより
Istioでは、EnvoyコンテナをPodにサイドカーとして自動的に追加してくれます。
インストール
IstioをKubernetesにインストールしていきます。
まずはistioctlをインストールします。
1brew install istioctlistioctlでIstioをインストールします。
1istioctl install --set profile=demo -yプロファイルを設定することでインストールされるコンポーネントを選択できます。

Installation Configuration Profiles
Describes the built-in Istio installation configuration profiles.
インストールされたリソースを確認してみます。
1❯ kubectl -n istio-system get all
2NAME                                        READY   STATUS    RESTARTS   AGE
3pod/istio-egressgateway-687f4db598-8x4ld    1/1     Running   0          51s
4pod/istio-ingressgateway-78f69bd5db-bxx85   1/1     Running   0          51s
5pod/istiod-76d66d9876-fxpxx                 1/1     Running   0          56s
6
7NAME                           TYPE           CLUSTER-IP      EXTERNAL-IP   PORT(S)                                                                      AGE
8service/istio-egressgateway    ClusterIP      10.103.138.48   <none>        80/TCP,443/TCP                                                               51s
9service/istio-ingressgateway   LoadBalancer   10.96.138.98    <pending>     15021:31085/TCP,80:31412/TCP,443:32435/TCP,31400:30649/TCP,15443:31312/TCP   51s
10service/istiod                 ClusterIP      10.103.121.71   <none>        15010/TCP,15012/TCP,443/TCP,15014/TCP                                        56s
11
12NAME                                   READY   UP-TO-DATE   AVAILABLE   AGE
13deployment.apps/istio-egressgateway    1/1     1            1           52s
14deployment.apps/istio-ingressgateway   1/1     1            1           52s
15deployment.apps/istiod                 1/1     1            1           56s
16
17NAME                                              DESIRED   CURRENT   READY   AGE
18replicaset.apps/istio-egressgateway-687f4db598    1         1         1       51s
19replicaset.apps/istio-ingressgateway-78f69bd5db   1         1         1       51s
20replicaset.apps/istiod-76d66d9876                 1         1         1       56s
サイドカーの有効化
Podにistio-proxyというEnvoyコンテナが追加される設定を有効化します。
1kubectl label namespace default istio-injection=enabledサンプルアプリのデプロイ
下記のIstioのリポジトリにあるサンプルアプリを使います。
istio/samples/bookinfo at master · istio/istio
Connect, secure, control, and observe services. Contribute to istio/istio development by creating an account on GitHub.
まずはアプリをデプロイします。
1kubectl apply -f bookinfo/platform/kube/bookinfo.yamlリソースを確認してみます。
1❯ kubectl get pod
2NAME                              READY   STATUS    RESTARTS   AGE
3details-v1-79f774bdb9-gsp4w       2/2     Running   0          11s
4productpage-v1-6b746f74dc-rtbll   2/2     Running   0          11s
5ratings-v1-b6994bb9-stppc         2/2     Running   0          11s
6reviews-v1-545db77b95-jpb2s       2/2     Running   0          11s
7reviews-v2-7bf8c9648f-nz87t       2/2     Running   0          11s
8reviews-v3-84779c7bbc-dgvsv       2/2     Running   0          11s
9
10❯ kubectl get svc
11NAME          TYPE        CLUSTER-IP      EXTERNAL-IP   PORT(S)    AGE
12details       ClusterIP   10.97.22.212    <none>        9080/TCP   35s
13kubernetes    ClusterIP   10.96.0.1       <none>        443/TCP    3m12s
14productpage   ClusterIP   10.105.76.38    <none>        9080/TCP   34s
15ratings       ClusterIP   10.98.161.119   <none>        9080/TCP   35s
16reviews       ClusterIP   10.96.79.48     <none>        9080/TCP   35s
アプリが正常に動いているか確認します。
1❯ kubectl exec "$(kubectl get pod -l app=ratings -o jsonpath='{.items[0].metadata.name}')" -c ratings -- curl -sS productpage:9080/productpage | grep -o "<title>.*</title>"
2<title>Simple Bookstore App</title>
Ingressの設定
Gatewayを作成します。
1kubectl apply -f bookinfo/networking/bookinfo-gateway.yamlLoadBalancerを確認してみます。
1❯ kubectl get svc istio-ingressgateway -n istio-system
2NAME                   TYPE           CLUSTER-IP      EXTERNAL-IP   PORT(S)
3istio-ingressgateway   LoadBalancer   10.96.222.197   <pending>     15021:32492/TCP,80:32494/TCP,443:31883/TCP,31400:31822/TCP,15443:31222/TCP   73s
ポート番号やURLを環境変数として設定しておきます。
1export INGRESS_PORT=$(kubectl -n istio-system get service istio-ingressgateway -o jsonpath='{.spec.ports[?(@.name=="http2")].nodePort}')
2export SECURE_INGRESS_PORT=$(kubectl -n istio-system get service istio-ingressgateway -o jsonpath='{.spec.ports[?(@.name=="https")].nodePort}')1export INGRESS_HOST=127.0.0.1
2export GATEWAY_URL=$INGRESS_HOST:$INGRESS_PORTポートフォワードします。
1kubectl -n istio-system port-forward svc/istio-ingressgateway 32494:80下記で確認できるURLにアクセスしてみます。
1❯ echo "http://$GATEWAY_URL/productpage"
2http://127.0.0.1:32494/productpage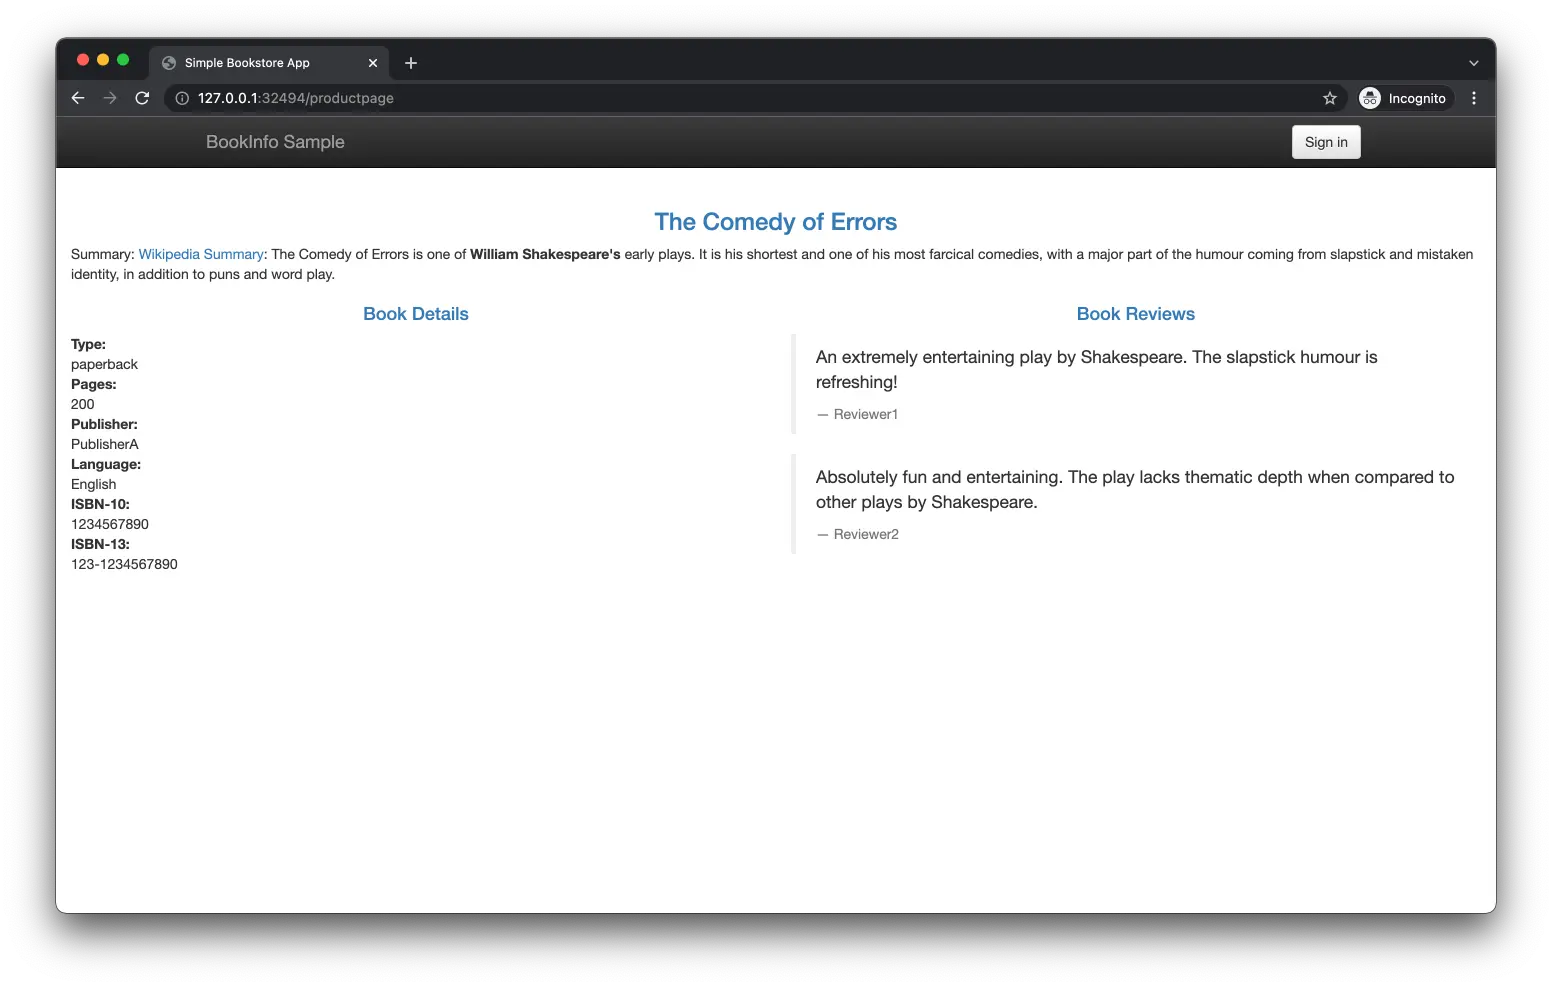
ダッシュボードの追加
下記のディレクトリのマニフェストを利用してダッシュボードを追加します。
istio/samples/addons at master · istio/istio
Connect, secure, control, and observe services. Contribute to istio/istio development by creating an account on GitHub.
1kubectl apply -f addons
2kubectl rollout status deployment/kiali -n istio-system
ダッシュボードの確認
ダッシュボードにアクセスします。
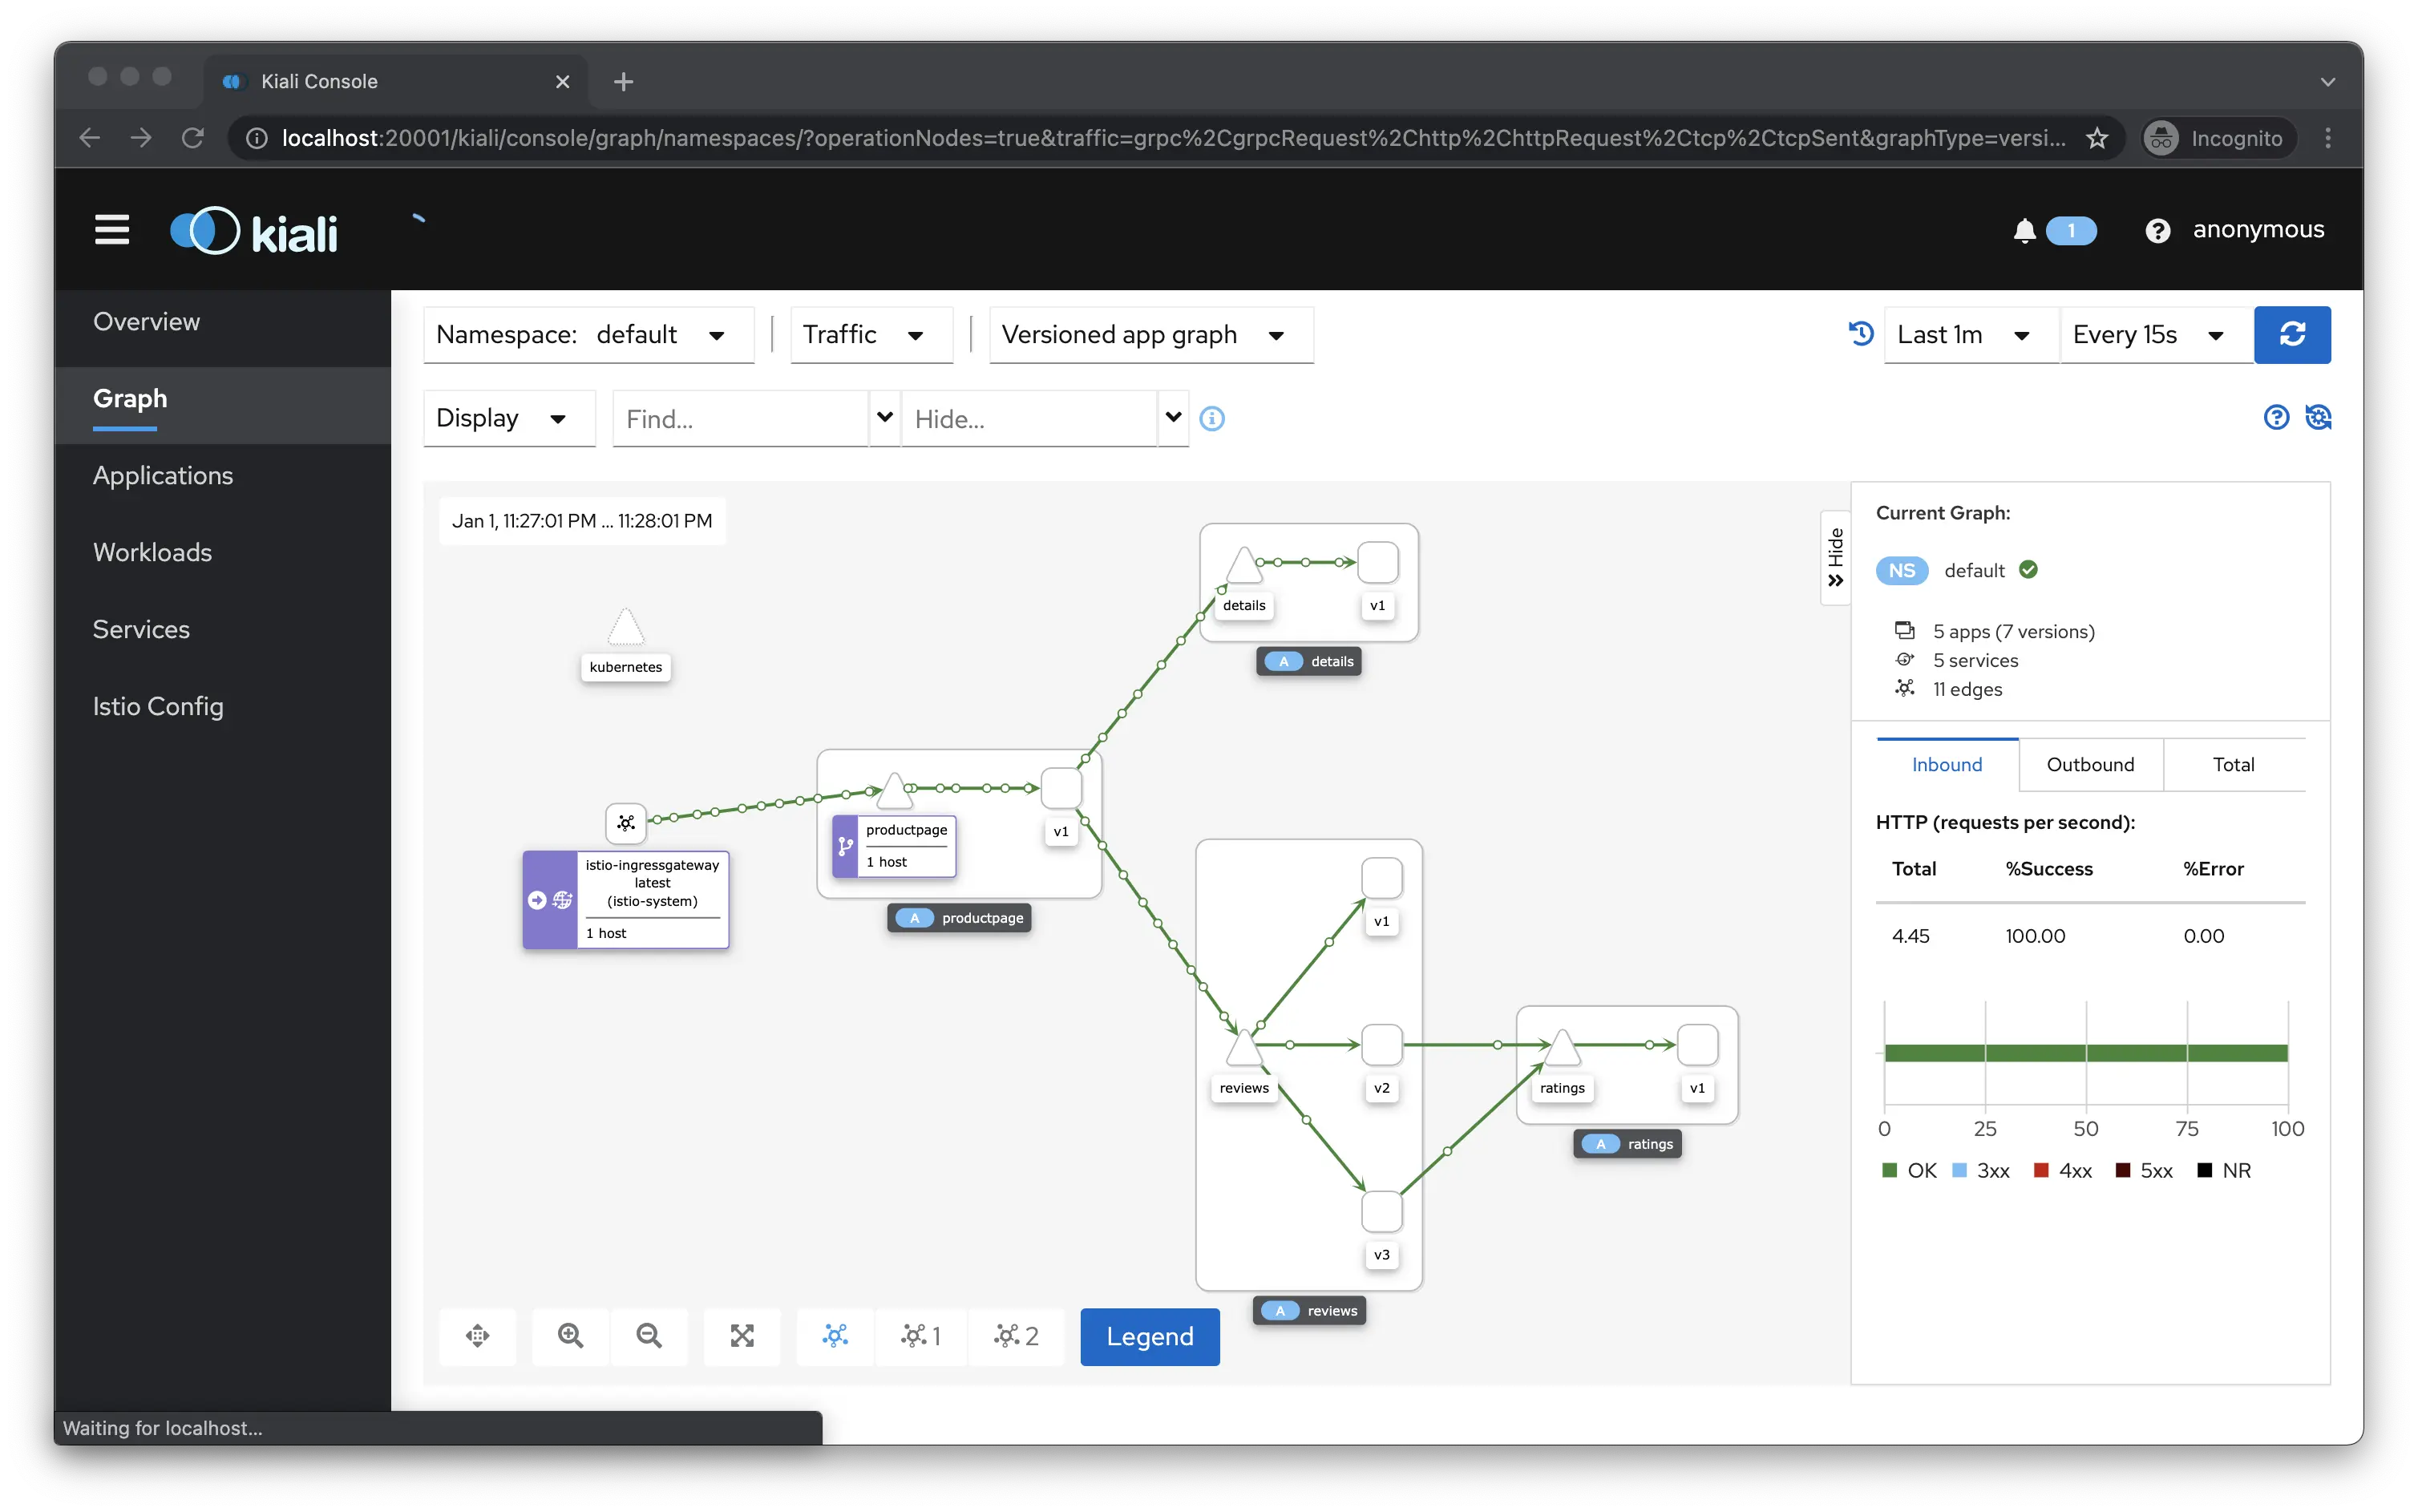
1istioctl dashboard kiali下記でリクエストを送ります。
1for i in $(seq 1 100); do curl -s -o /dev/null "http://$GATEWAY_URL/productpage"; doneリクエストが送られてくるとトラフィックがどのように流れているかが可視化されているのがわかります。
まとめ
- Istioはサービスメッシュを実装する
- ダッシュボードでトラフィックが可視化できる
参考
- Istio / Documentation
- Istio / Getting Started
- Istio / Installation Guides
- Istio / Architecture
- istio/samples/bookinfo at master · istio/istio
- istio/samples/addons at master · istio/istio
- Envoy documentation — envoy 1.21.0-dev-e9f36d documentation


