【超基礎】Istioでのトラフィック制御
はじめに
Istioのトラフィック制御関連のカスタムリソースについて、ざっくり解説していきます。
また、その中からよく使うものを実際に動かしながら理解していきたいと思います。
Istioの基礎については、こちらで解説しています。
【Istio】実際に動かしてざっくり理解するIstio
:::affiliate-message 本ページはAmazonアフィリエイトのリンクを含みます。
トラフィック制御に関するカスタムリソース
Istioでのトラフィック制御関連のカスタムリソースは下記の通りです。
| リソース | 説明 |
|---|---|
VirtualService | サービスメッシュ内のトラックのルーティングを設定 |
DestinationRule | 実際に届くトラフィックのルールを設定 |
Gateway | 外部とのトラフィックの出入口を定義 |
ServiceEntry | サービスレジストリに宛先を追加 |
Sidecar | サイドカーのEnvoyプロキシの設定 |
基本的には、Gatewayでサービスの出入口を定義して、VirtualServiceでどのAPIにトラフィックを届けるか決め、DestinationRuleで実際にトラフィックが届くAPIが決定するという流れになります。
ServiceEntryとSidecarは適宜使うようなイメージです。
ローカルで試す
今回は、Istioのサンプルアプリを使って、Gateway、VirtualSerive、DestinationRuleを実際に動かしていきます。
istio/samples/bookinfo at master · istio/istio
Connect, secure, control, and observe services. Contribute to istio/istio development by creating an account on GitHub.
Istioのインストール
まずは、istioctlでIstioのコンポーネントをインストールします。
1istioctl install --set profile=demo -yインストールされたコンポーネントを確認します。
1❯ kubectl get all -n istio-system
2NAME                                        READY   STATUS    RESTARTS   AGE
3pod/istio-egressgateway-5765b65799-2frz8    1/1     Running   0          20s
4pod/istio-ingressgateway-5ff4b47bb7-7w589   1/1     Running   0          20s
5pod/istiod-57c5d796fc-98md9                 1/1     Running   0          27s
6
7NAME                           TYPE           CLUSTER-IP      EXTERNAL-IP   PORT(S)                                                                      AGE
8service/istio-egressgateway    ClusterIP      10.109.101.79   <none>        80/TCP,443/TCP                                                               20s
9service/istio-ingressgateway   LoadBalancer   10.102.72.120   localhost     15021:32617/TCP,80:32710/TCP,443:32299/TCP,31400:32356/TCP,15443:31325/TCP   20s
10service/istiod                 ClusterIP      10.97.105.18    <none>        15010/TCP,15012/TCP,443/TCP,15014/TCP                                        26s
11
12NAME                                   READY   UP-TO-DATE   AVAILABLE   AGE
13deployment.apps/istio-egressgateway    1/1     1            1           20s
14deployment.apps/istio-ingressgateway   1/1     1            1           20s
15deployment.apps/istiod                 1/1     1            1           27s
16
17NAME                                              DESIRED   CURRENT   READY   AGE
18replicaset.apps/istio-egressgateway-5765b65799    1         1         1       20s
19replicaset.apps/istio-ingressgateway-5ff4b47bb7   1         1         1       20s
20replicaset.apps/istiod-57c5d796fc 1 1 1 27s今回重要になるのはistio-ingressgatewayです。Envoyコンテナを含むPodとLoadBalancerタイプのServiceからなるコンポーネントで、クラスタ外からのトラフィックを受け付ける入口になります。ここでは、EXTERNAL-IPがlocalhostになっています。
ingressgatewayとありますが、カスタムリソースのGatewayとは異なります。
サイドカーの有効化
PodにEnvoyコンテナがサイドカーとして追加されるように、ラベルの設定を有効化します。
1kubectl label namespace default istio-injection=enabledアプリのデプロイ
Istioのサンプルアプリ(bookinfo)をデプロイします。
istio/samples/bookinfo at master · istio/istio
Connect, secure, control, and observe services. Contribute to istio/istio development by creating an account on GitHub.
1kubectl apply -f bookinfo/platform/kube/bookinfo.yamlサンプルアプリの構成は下記の通りです。
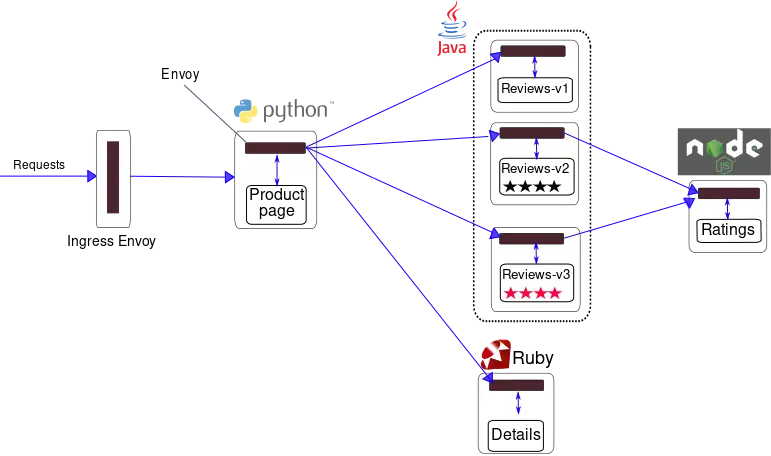 Istioのドキュメントより
デプロイしたリソースを確認してみます。
1❯ kubectl get pod,svc
2NAME                                  READY   STATUS    RESTARTS   AGE
3pod/details-v1-586577784f-tpmr2       2/2     Running   0          12s
4pod/productpage-v1-589b848cc9-wb47g   2/2     Running   0          11s
5pod/ratings-v1-679fc7b4f-pfmt9        2/2     Running   0          12s
6pod/reviews-v1-7b76665ff9-5xkk4       2/2     Running   0          12s
7pod/reviews-v2-6b86c676d9-nk562       2/2     Running   0          12s
8pod/reviews-v3-b77c579-xc4lr          2/2     Running   0          12s
9
10NAME                  TYPE        CLUSTER-IP       EXTERNAL-IP   PORT(S)    AGE
11service/details       ClusterIP   10.104.173.141   <none>        9080/TCP   12s
12service/kubernetes    ClusterIP   10.96.0.1        <none>        443/TCP    3m11s
13service/productpage   ClusterIP   10.102.202.100   <none>        9080/TCP   12s
14service/ratings       ClusterIP   10.99.99.43      <none>        9080/TCP   12s
15service/reviews       ClusterIP   10.96.13.117     <none>        9080/TCP   12s
ingress-gatewayに対するGatewayとVirtualServiceの作成
トラフィック制御関連のリソースを作成していきます。
まずは、istio-ingressgatewayに対して、GatewayとVirtualServiceを作成します。
Gatewayというリソースは、istio-ingressgatewayのようなIngress Gatewayに対して入口を定義するリソースと言えます。
GatewayとVirtualServiceのマニュアルは下記の通りです。説明用のコメントを入れています。
1apiVersion: networking.istio.io/v1alpha3
2kind: Gateway
3metadata:
4  name: bookinfo-gateway
5spec:
6  selector:
7    istio: ingressgateway # istio-ingressgatewayに付与されているラベル(どのIngress Gatewayに対してか)
8  servers:
9  - port:
10      number: 80 # Port80で受け付ける(Ingress Gatewayのどのポートか)
11      name: http
12      protocol: HTTP
13    hosts:
14    - "*" # 全ての宛先へのトラフィックを受け付ける
15---
16apiVersion: networking.istio.io/v1alpha3
17kind: VirtualService
18metadata:
19  name: bookinfo
20spec:
21  hosts:
22  - "*" # 全ての宛先へのトラフィックに対してルーティングを適用(どの宛先向けのトラフィックにルーティングを適用するか)
23  gateways:
24  - bookinfo-gateway # bookinfo-gatewayに対してルーティングを適用(どこに適用するか)
25  http:
26  - match: # マッチするルールの定義
27    - uri:
28        exact: /productpage
29    - uri:
30        prefix: /static
31    - uri:
32        exact: /login
33    - uri:
34        exact: /logout
35    - uri:
36        prefix: /api/v1/products
37    route:
38    - destination: # マッチした場合の宛先
39        host: productpage # productpageというServiceへトラフィックを送る
40        port:
41 number: 9080GatewayとVirtualServiceを作成します。
1kubectl apply -f bookinfo/networking/bookinfo-gateway.yamlこれで、アプリへの入口が定義できました。
アプリの動作確認
Ingress GatewayのポートやIPアドレスを環境変数として設定して、動作確認します。
1export INGRESS_HOST=$(kubectl -n istio-system get service istio-ingressgateway -o jsonpath='{.status.loadBalancer.ingress[0].ip}')
2export INGRESS_PORT=$(kubectl -n istio-system get service istio-ingressgateway -o jsonpath='{.spec.ports[?(@.name=="http2")].port}')
3export SECURE_INGRESS_PORT=$(kubectl -n istio-system get service istio-ingressgateway -o jsonpath='{.spec.ports[?(@.name=="https")].port}')
4export INGRESS_HOST=127.0.0.11export GATEWAY_URL=$INGRESS_HOST:$INGRESS_PORTIngress GatewayへのURLを確認します。
1❯ echo $GATEWAY_URL
2127.0.0.1:80
設定した変数を使って、動作確認します。
1❯ curl -s "http://${GATEWAY_URL}/productpage" | grep -o "<title>.*</title>"
2
3<title>Simple Bookstore App</title>
DestinationRuleの作成
次にDestinationRuleを作成します。
bookinfo/networking/destination-rule-all.yamlでは、各バージョンへトラフィックを流すためのルールが定義されています。
1...
2apiVersion: networking.istio.io/v1alpha3
3kind: DestinationRule
4metadata:
5  name: reviews
6spec:
7  host: reviews
8  subsets:
9  - name: v1 # ルールの名前
10    labels:
11      version: v1 # ラベルがついているPodへトラフィックを流す
12  - name: v2
13    labels:
14      version: v2
15  - name: v3
16    labels:
17      version: v3
18...DestinationRuleを作成します。
1kubectl apply -f bookinfo/networking/destination-rule-all.yaml各APIのVirtualServiceの作成
DestinationRuleを使って、トラフィックを流すPodを決定するVirtualServiceを作成します。
bookinfo/networking/virtual-service-all-v1.yamlでは、サービスメッシュ内でのルーティングが定義されています。
1...
2apiVersion: networking.istio.io/v1alpha3
3kind: VirtualService
4metadata:
5  name: reviews
6spec:
7  hosts:
8  - reviews # reviewsというServiceが宛先のトラフィックに対するルーティング
9  # gatewaysがない場合はサービスメッシュ内の全てのサイドカーにルールが適用される
10  http:
11  - route:
12    - destination:
13        host: reviews # reviewsというServiceにトラフィックを流す
14        subset: v1 # DestinationRuleで定義したルールに従ってトラフィックを流す
15...VirtualServiceを作成します。
1kubectl apply -f bookinfo/networking/virtual-service-all-v1.yaml動作確認
ダッシュボードを確認しながら、実際にどう動作しているか確認します。
まずはダッシュボードをデプロイします。
1kubectl apply -f addons
2kubectl rollout status deployment/kiali -n istio-system
ダッシュボードにアクセスします。
1istioctl dashboard kiali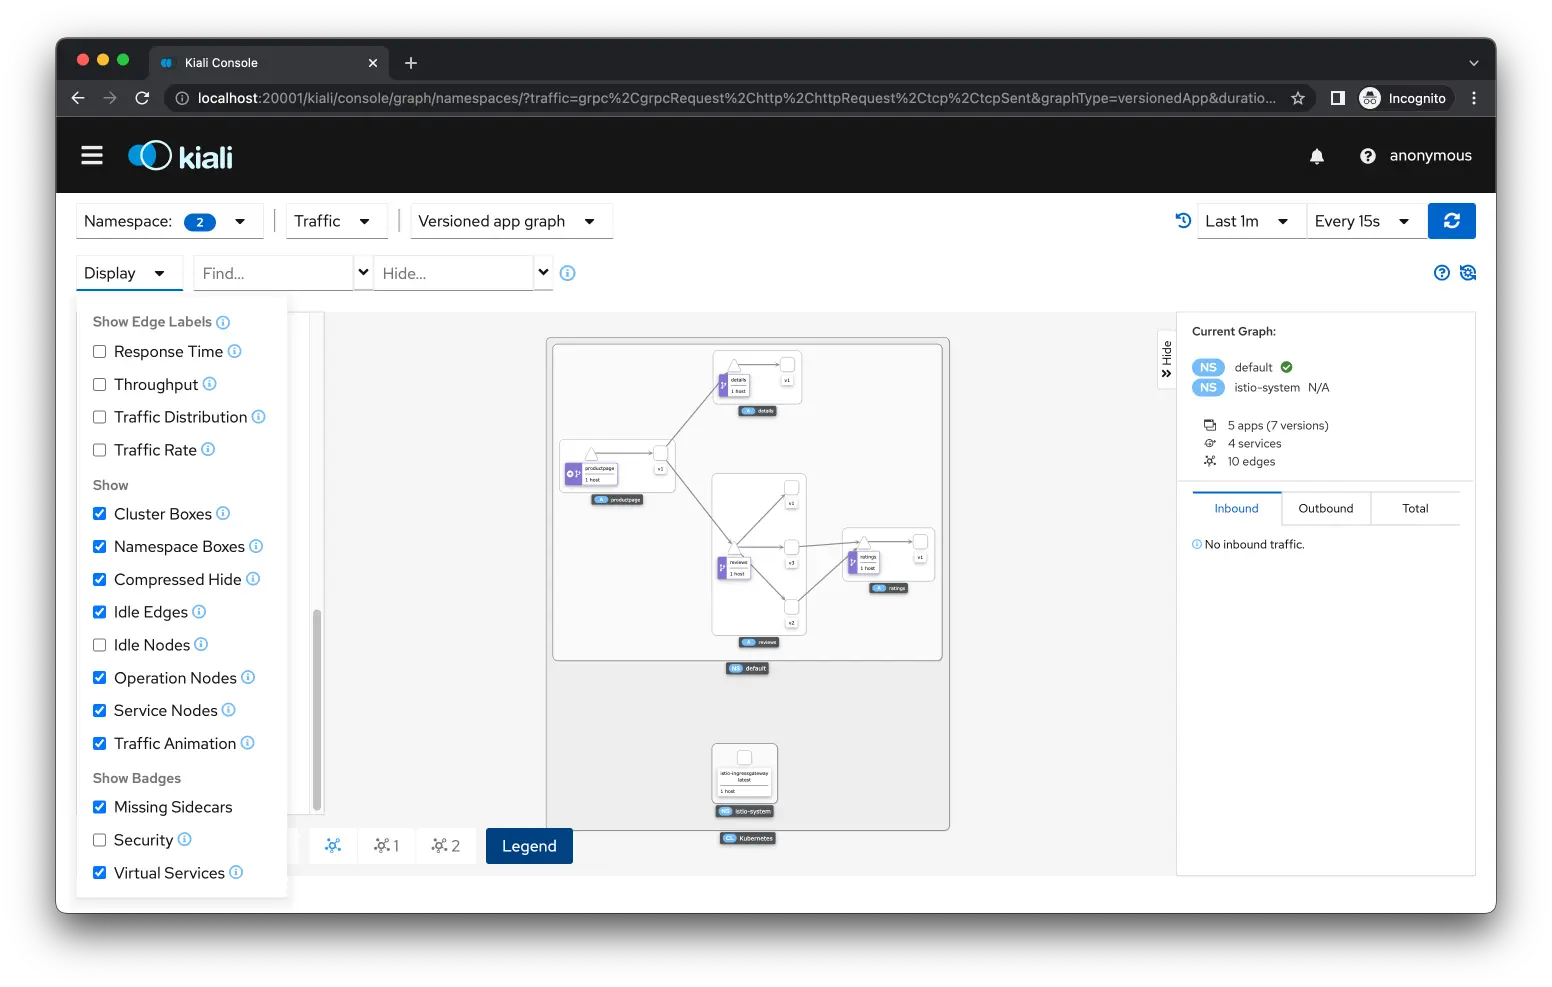
トラフィックを流して、どのようにトラフィックが流れるか確認します。
1for i in $(seq 1 100); do curl -s -o /dev/null "http://$GATEWAY_URL/productpage"; done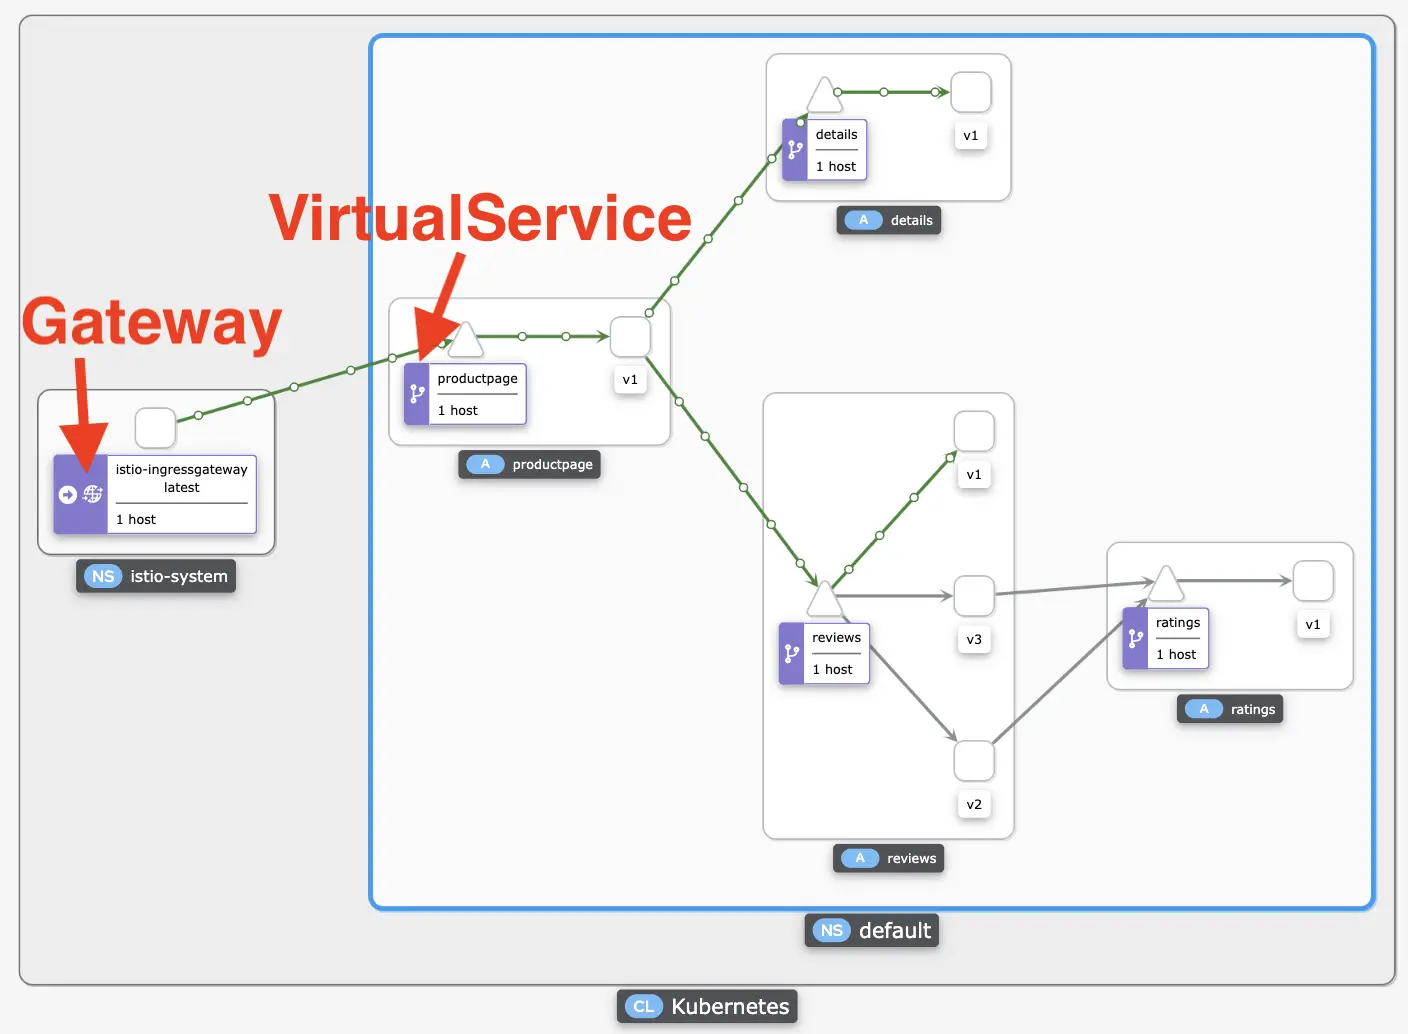
istio-ingressgatewayにGatewayが、各APIにVirtualServiceが定義されていることが確認できます。特に、productpageへのVirtualServiceは、Gatewayの設定によりistio-ingressgatewayからのトラフィックに対してルーティングしていることがわかります。
また、reviewsはDestinationRuleとVirtualServiceで定義したようにv1のPodにのみトラフィックが流れています。
Virtual Serviceの変更
reviewのトラフィックをv3のPodに流れるように変更してみます。
bookinfo/networking/virtual-service-reviews-v3.yamlで、VirtualServiceのルーティング設定を変更できます。
1apiVersion: networking.istio.io/v1alpha3
2kind: VirtualService
3metadata:
4  name: reviews
5spec:
6  hosts:
7    - reviews
8  http:
9  - route:
10    - destination:
11        host: reviews
12 subset: v3 # DestinationRuleで定義したv3のルールに従ってトラフィックを流すreviewsのVirtualServiceを更新します。
1kubectl apply -f bookinfo/networking/virtual-service-reviews-v3.yaml再度、トラフィックを流して確認します。
1for i in $(seq 1 100); do curl -s -o /dev/null "http://$GATEWAY_URL/productpage"; doneトラフィックがv3に流れるようになりました。

参考
- Istio / Traffic Management
- Istio / Bookinfo Application
- Istio / Ingress Gateways
- Istio / Traffic Management
- Istio / Virtual Service
- Istio / Gateway
- istio/istio: Connect, secure, control, and observe services.
\ この記事が役に立ったと思ったら、サポートお願いします! /